HOW I MADE THIS DIY FLUTED SIDE TABLE
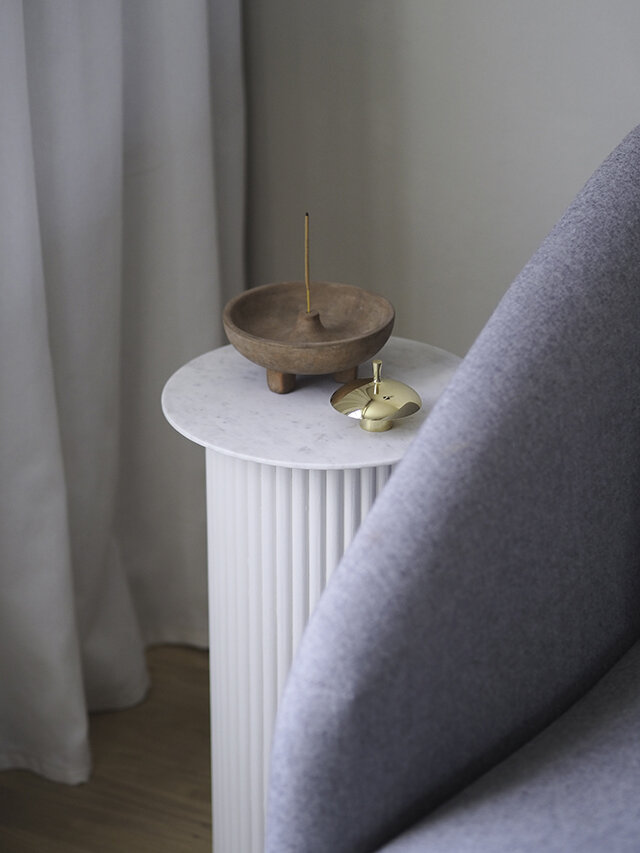
I was dead-set on a particular side table for my living room makeover - I even included it in my sketch during the planning process! Tempting fate, because, of course, when I came to buy it, it was sold out and not coming back into stock.
Super annoying, especially if you have your heart set on something, but decided I could probably make something similar without spending too much. So here’s the DIY process for the side table I came up with!
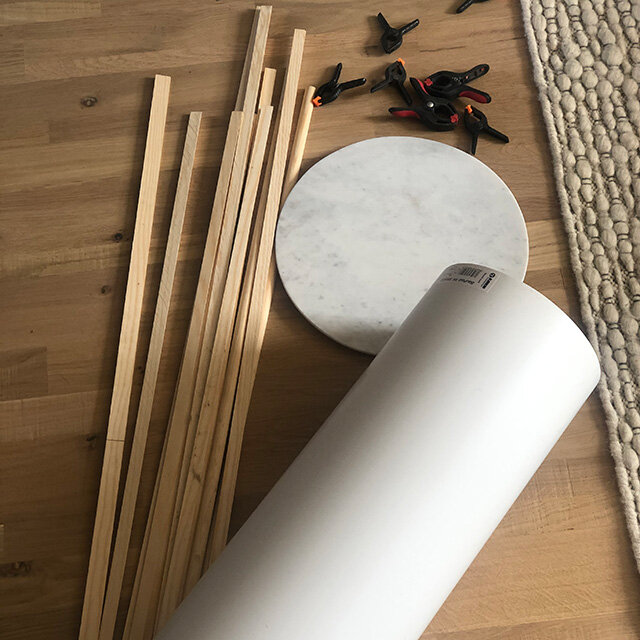
I had this planned for a while, but I really struggled to find a centre core that was the right size and shape, but eventually discovered this plastic duct pipe that did the job nicely.
So this is what I bought:
14mm half pine moulding - 10 x 2400mm lengths
I also used these which I already owned:
Circular saw (you can do it with a hand saw, but will take some time)
Gorilla Glue
Spring clamps (the more, the better, trust me on that)
Paint (I used Earthborn in Flutterby)
You can watch the video version, or I’ve done the steps below:

STEP 1
As my duct pipe was 500mm long, I needed to cut the pine mouldings into 500mm strips too. I did measure first, but kept checking as I was cutting to try and be as precise as possible to get the best finish. I used a circular saw – just make sure you keep them fixed down while cutting to get clean cuts.

STEP 2
Once they’re all cut, start by glueing down the first piece of moulding. You’ll want to do one first by itself and get it stuck to make sure it’s super straight so you’ve got a good foundation to build on. I used Gorilla Glue, which is dry enough to work with in about 1 hour, but fully cured in 2. Don’t use a crazy amount, and then spring clamp in to the duct pipe, making sure that you keep one edge of the pipe at least perfectly aligned with the pipe - the other end will be more hidden by the table top. Wait for the 2 hours for this one, and cut off any glue that seeps out the side with a craft knife before starting to lay the next strips.


STEP 3
After yo’ve laid the first, keep glueing strips as many as a time as your number of spring clamps allows, letting the glue dry for at least 1 hour before removing the clamps and 2 hours if you need to cut glue away. If when you get to the final strip, the spacing is a little off use some sandpaper to sand down the last piece until it fits. This can be the back of the table if too noticeably different.
STEP 4
Once you’re finished sticking the strips, time to paint! I used Earthborn clay paint – it’s not necessarily for wood, but has a great matte texture.
STEP 5
After it was painted and dry, I attached the board to the top. I used Gorilla glue again on the top side of the moulding strips and let the natural weight of the board hold itself in place to glue. Make sure it’s centred and leave to dry.

What do you think? Going to give this project a go? Let me know in the comments